Setting up Google Authenticator on your phone requires only a few steps and about 5 minutes. It has become the standard way to use 2-factor authentication (2FA) to secure your online accounts, and we’re going to walk step-by-step through the setup process.

In this Google Authenticator setup tutorial, you have the choice of either watching the video and following along…
…or scrolling through the written instructions step by step.
IMPORTANT NOTICE!
Most security experts now agree that Google Authenticator isn’t the most secure option. It’s better than nothing, but click the link here to understand why it isn’t secure and what free alternatives exist.
In 10 minutes or less, you will install and be properly using Google Authenticator on your mobile phone.
Getting Started with Google Authenticator
Getting started with Google Authenticator is a straightforward process that requires just a few simple steps. First, download and install the Google Authenticator app on your mobile device. The app is available for both Android and iOS devices, making it accessible no matter which platform you use.
You will have the option to sign into your Google account when you open the authenticator app. This is not required. Signing into your Google account allows you to store a backup of all your codes in the cloud, but also adds a bit of security risk. The choice is yours.
Once installed, open the app and click on the “+” button to add a new account.
You will be prompted to either scan a QR code or enter a secret key manually. If you choose to scan a QR code, ensure your device’s camera is enabled and pointed at the QR code displayed on your computer screen. This method is quick and minimizes the risk of errors.
If you prefer to enter a secret key manually, make sure to type the key accurately to avoid any setup issues. This secret key is crucial for generating the correct Google Authenticator codes for your accounts. See below for a more detailed explanation with visuals.
Google Authenticator Setup (Video Tutorial)
If you prefer to see this process in action, the following video on the All Things Secured YouTube channel is part of our Tech Tips Tuesday segment where we cover important changes you should start making in your online security.
Give it a quick watch:
Be sure to subscribe to the All Things Secured YouTube channel!

How to Use Google Authenticator to Secure Online Accounts
Time needed: 10 minutes
In order to use Google Authenticator as a form of 2-factor authentication, take note of the following steps as a google authenticator key example. Multi-factor authentication is an essential feature for securing accounts and plays a crucial role in establishing robust security measures.
- Download the Authenticator App
As we mentioned above, Google Authenticator is available on both the iOS App Store as well as the Google Play store for your Android device. It’s free to download and use, so there’s no need to pay any subscription fee. I recommend you download the app on your phone instead of a tablet, since you’ll need to have the device always with you when a code is required.
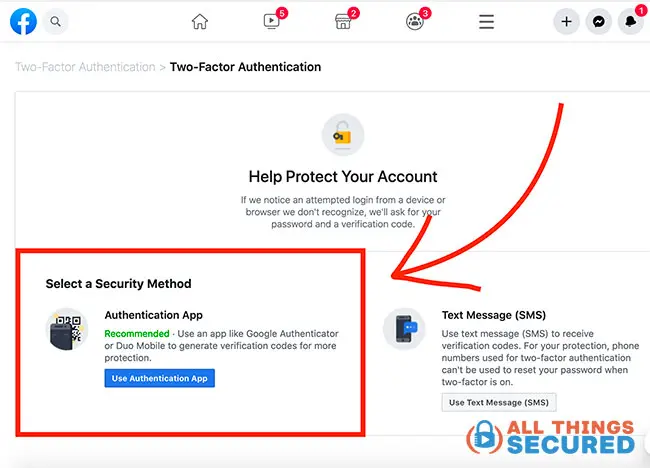
- Locate 2-Factor Authentication Settings
Within the security settings of many online accounts, you’ll find an option for 2-factor authentication (2FA). Most major social platforms (Facebook, Instagram, Twitter), email providers and investment accounts will offer 2FA, but not all of them do. In the example here, you’ll see the 2-Factor Authentication settings from within Facebook.

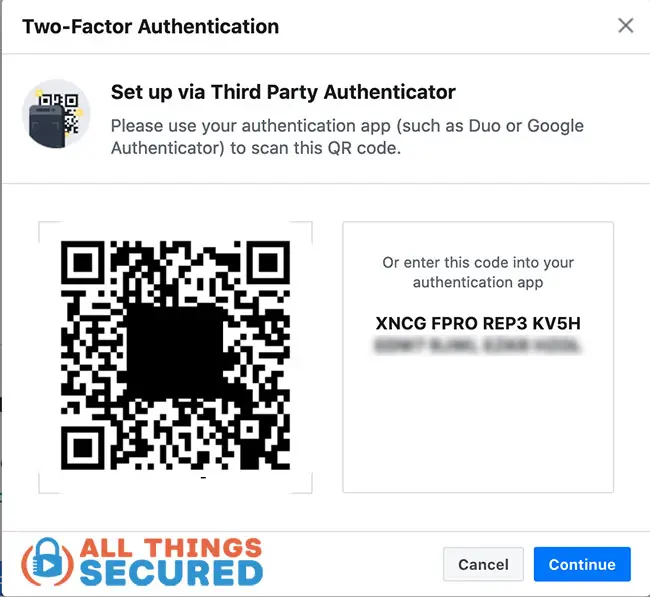
- Scan the QR Code or Enter Code Manually
When you set up Google Authenticator for 2-factor authentication, the account security settings will either display a QR code or a 32-digit code (or both).
Click the “+” button on the top right corner of the authenticator app and choose “Scan barcode”. If you only have one device, you can manually set up your 2FA codes with the code.
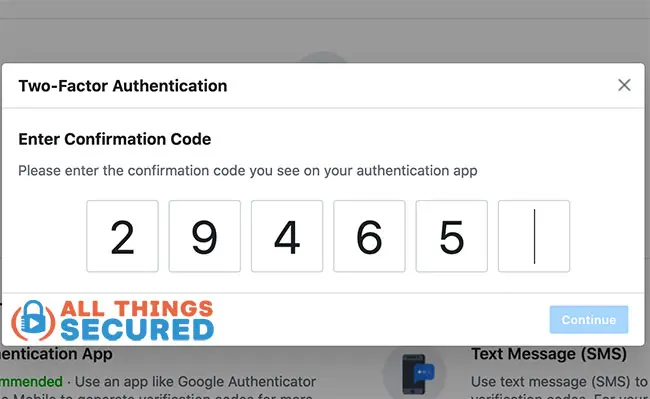
- Confirm 2FA Code
After the QR code has been scanned or the 32-digit code entered, click “Save” or “Next” and you’ll see the new account show up on the home screen of the app. In the account settings where you’re attempting to set up 2-factor authentication, click “Next” or “Continue” where you’ll usually be asked to confirm the code has been set up correctly.

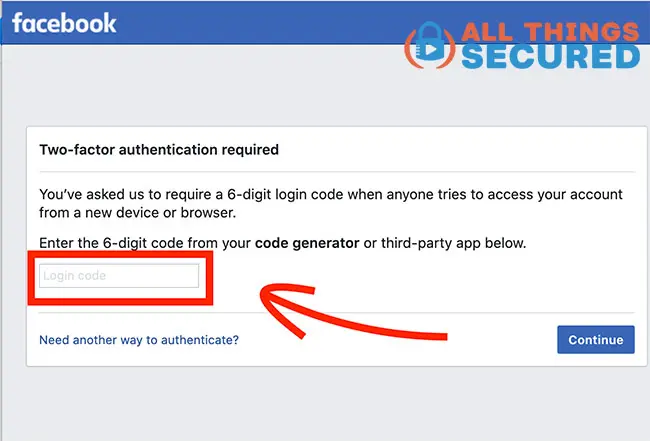
- Use the Google Authenticator 6-digit code to Sign In
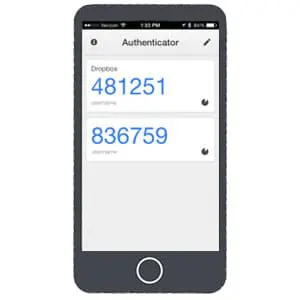
At this point, your 2-factor authentication has been configured and the app has been set up properly. Depending on your settings, you may be required to enter this 6-digit code every time you log in, every time you set up a new device or even just once every set period of days/weeks.

Managing Your Authenticator App Codes
Managing your authenticator codes is an essential part of using Google Authenticator effectively. To manage your codes, open Google Authenticator and click on the three dots in the top right corner of the screen. This will open a menu where you can edit, delete, or reorder your codes.
To edit a code, simply swipe left on the code and click on the edit option. This allows you to update any details associated with the code.
To delete a code, swipe right on the code and click on the delete option. BE CAREFUL! This is useful if you no longer need the code for a particular account. If you want to reorder your codes for better organization, touch and hold on a code and drag it to the desired location.
Additionally, you can use the search bar at the top of the screen to quickly find a specific code, making it easier to manage multiple accounts.
Troubleshooting and Recovery
Troubleshooting and recovery are essential parts of using Google Authenticator, especially if you encounter any issues. Google gives you two ways to backup your codes in case your device is lost or stolen:
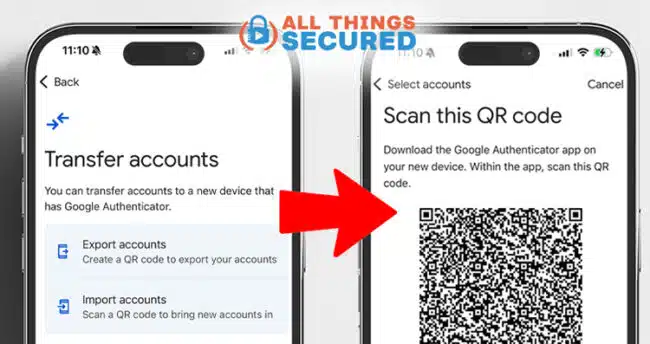
- Backup Export: You can export your codes as a QR image to be saved and later used when you are transferring your Google 2FA codes to a new device. Click on the three bars on the upper-left, find “Transfer Accounts” and then click “Export Accounts”. You can only export 10 at a time, so if you have a lot of codes it may take multiple exports.
- Google Account Backup: You can also opt to connect your app directly to your Google account (the same one you use for Gmail, YouTube, etc.). Doing this presents some risks since you will be entrusting Google with all of your backup codes, but it is simple and easy. You can check whether you are doing a cloud backup by checking the cloud icon on the homescreen.
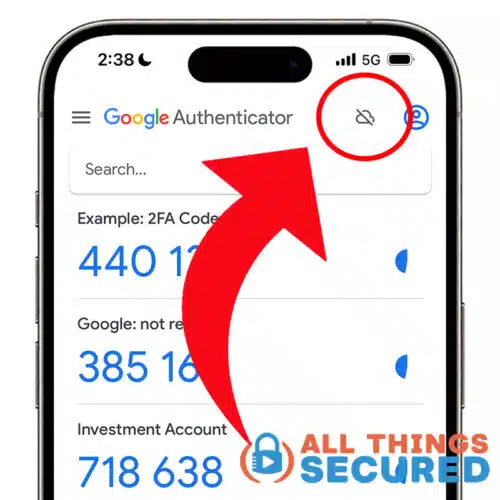
In the example above, the app is NOT backing up to the Google cloud.
To restore codes from an online cloud backup, open the app on the new device and click on the “+” button to add a new account. Then, sign in to your Google Account and follow the prompts to recover your codes.
If you encounter other issues, such as a code not working, try restarting the app or checking the time on your device to ensure it is accurate. Time discrepancies can cause codes to be invalid. If the problem persists, you may need to re-scan the QR code or re-enter the secret key for the affected account. These steps can help resolve most common issues and ensure that your app functions correctly.
Advanced Features and Customization
Google Authenticator offers several advanced features and customization options to enhance your security and user experience. One of the standout features is the ability to generate codes without an internet connection or mobile service. This is particularly useful if you need to access your accounts in areas with limited or no internet connectivity.
Another valuable feature is the ability to customize the app’s settings. For instance, you can adjust the time correction setting to ensure that your codes are always accurate. This is crucial for maintaining the reliability of your two-factor authentication. Additionally, you can use the issuer parameter to customize the display of your codes. This allows you to add a logo or change the color scheme, making it easier to identify different accounts at a glance.
By leveraging these advanced features and customization options, you can enhance both the security and usability of your Google Authenticator app.
Pro Tips for Using 2FA Authenticator Apps
While the app itself is very simple, there are a few pro tips I’ve learned from using the app for the past couple of years.
- App Security: The Google Authenticator app can be set up to require biometric data to open (Face ID, Fingerprint, etc.) and this is recommended to use. Failure to add biometric protections means that anybody who has your 6-digit phone code could easily get access to your 2FA codes, which is a security risk.
- Backup Codes are Important: Scanning the QR code is by far the most convenient way to set up Google Authenticator. However, it’s important that you keep the manual code in an extremely safe place in the event that your phone gets lost or stolen. These backup codes could save you a ton of headache in the future!
- Use Multiple 2FA Options: For most online accounts, you’re not restricted to just one form of 2-factor authentication. For example, you could set up Facebook with both the Google Authenticator as well as with a 2FA security key. Either could be used to verify your account and act as a backup for each other. I use and recommend is Yubikey.
- Tap to Copy the Code: Usually, 6 digits is pretty easy to remember, but not always. If you’re logging on to an account from your phone and it requires you to open the authenticator app for a code, simply tap the appropriate code and it will be copied to your clipboard. Now you no longer have to remember it!
If you have any other tips to add here, I encourage you to share them in the comment section below!

Google Authenticator Frequently Asked Questions
There are quite a few questions that I get from people about using this app for 2-factor authentication. Let’s answer the most common ones here.
The key for Google Authenticator is the QR code or the 32-digit code provided in the 2-factor authentication settings of the online account you are trying to secure. This key can either be scanned or manually entered into the Authenticator app.
Yes, you can and it’s always good to create a backup of your codes. Simply use the same QR code or manual code provided by your online account to set up both devices at the same time and check to make sure that they provide the same 6-digit code for 2FA verification.
To transfer codes, you can either export your Google Authenticator codes from the app via a QR code or you can sync your Google Authenticator codes to the cloud.
For the most part, yes. Using an authenticator app is better than using SMS text codes for 2-factor authentication, but not quite as secure as using physical 2FA keys. There have been reports that Android malware can steal these one-time passcodes (OTP), but this is extremely rare.
Yes! It is possible to migrate your codes to a new phone, either via export or through cloud sync. You can follow this tutorial to transfer your Google Authenticator codes to see how it’s done.
Next Steps in Online Security
Congrats on setting up 2-factor authentication on your mobile device!
This is the first of many steps that I recommend you take to start taking control of your online security and privacy. I even have a helpful checklist you can download that will walk you through the most important changes you need to make.
So what’s next? Here are a few things to consider:
- Get Better Passwords: Not every online login allows for 2-factor authentication, so creating stronger passwords is incredibly important! You can check your current password strength using our password checker tool or you can browse our list of the best password manager apps.
- Update Your Privacy Settings: You may not realize all the information you’re giving away for free to anybody who is willing to dig a bit! One of the best things you can do is change the privacy settings on your Facebook account to make sure you’re only sharing your information with the people you want to see it.
- Start Using a 2FA Key: Most experts agree that the most secure form of 2-factor authentication is using a physical key. To learn more about this, check out our 2FA security key setup tutorial.
- Monitor Your Identity: Did you know that you can download a free copy of your credit report once per year? And since there are three credit bureaus, you can do this at least once every 4 months. Make sure there isn’t anything unusual. And if you know that your data has been exposed, you should get a credit monitoring service like Identity Guard. Think of it like an home alarm system for your identity.