Your iPhone – that tiny, GPS-enabled tracking device that we never keep more than two feet away from our body – is one of the most sensitive vaults of personal data we have. These are the most important iPhone security settings you need to update…and thankfully it only takes a few short minutes!
Key Takeaways
- Set a strong iPhone passcode (6+ digits or alphanumeric) for enhanced security against unauthorized access.
- Limit control center and lock screen access to prevent misuse if your iPhone is lost or stolen. Only allow essential features like Siri.
- Review and revoke unnecessary location and Bluetooth permissions for apps to prevent tracking.
- Delete data-tracking apps like Facebook and use a browser for access.
- Other security changes include enabling Stolen Device Protection & two-factor authentication for iCloud, employing a password manager, avoiding geotagging social media posts, and choosing a secure mobile provider like Efani.
Right out of the box, the Apple iPhone is considered one of the most secure and private devices you can own.
Unfortunately, what this means is that most iPhone users think they don’t need to do anything else to maintain their privacy and security. You’re all good to go!
Not quite.
It’s worth the effort to dig into your iPhone security settings and monitor what you’re doing, and that’s what we’re going to cover here.
There are various ways to check if your iPhone has been hacked, but we’re going to cover the following 10 iPhone security settings you need to consider:
- iPhone Unlock Code
- Stolen Device Protection
- Secure Lockscreen
- Manage Location & Bluetooth
- Use a Password Manager
- Mail Privacy Protection
- Delete these Apps!
- Enable 2-Factor Authentication
- Limit GPS Tagging
- BONUS: Mobile Provider
Let’s jump in!
Create a Stronger iPhone Unlock Code
The first and lowest hanging fruit is your iPhone unlock code, which is the code you have to use to unlock your phone when Fingerprint or Face ID doesn’t work.
If you’re still using a 4-digit unlock code, you might want to make some changes.
Apple now gives you a lot more flexibility in the length and type of passcode you use. I recommend you set a numeric passcode that’s at least 6 digits long, if not longer.
If you want an inconvenient but secure code, you can do an alphanumeric phrase, which means you’re not just using numbers, but also letters and symbols.
How to Change Your Passcode in iPhone Security Settings
To change your passcode in your iPhone security settings, follow along with these instructions:
- Open your Settings app;
- Scroll down to find Face ID & Passcode; you’ll be prompted to enter your current passcode)
- Click on Change Passcode (you’ll be required to enter your passcode again)
- Click Passcode Options.
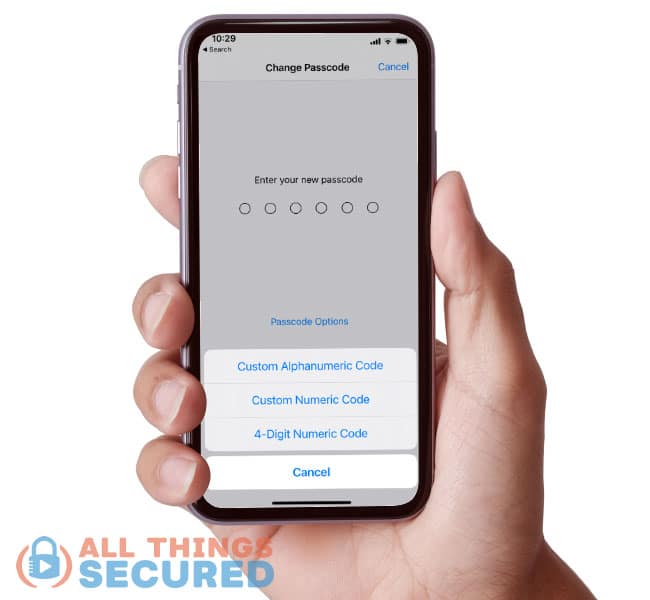
It’s the custom codes you see in the screenshot below that you want to choose here in order to secure your iPhone.
Protect Data With Stolen Device Protection
To combat the unfortunate truth of device theft, Apple has introduced Stolen Device Protection. This security measure allows you to remotely locate, lock, or even erase your device’s data, preventing unauthorized access.
Stolen Device Protection includes the option to set a security delay that imposes a waiting period before your device can be erased or reactivated, giving you ample time to retrieve your lost iPhone.
How to Turn on Stolen Device Protection on an iPhone
Here’s how to activate Stolen Device Protection on your iPhone to safeguard your data if it’s lost or stolen.
- Open the Settings app.
- Select the Face ID & Passcode option and enter your passcode.
- Scroll down to locate Stolen Device Protection.
- Enable Stolen Device Protection by toggling the switch if it’s not already on.
Secure Your iPhone Lockscreen
Another critical change in this passcode setting has to do with your lock screen. For iPhones, your lock screen presents more of a security risk than you may realize.
For example, if I steal your phone and you’ve allowed the Control Center to be accessed while locked, I can easily swipe down and turn on airplane mode.
Now when you try to locate your missing phone, it will no longer show up.
How to Secure Your Lockscreen
Thankfully, this lockscreen is an easy fix.
- Open your Settings app;
- Scroll down and click on Face ID & Passcode, which will require you to input your current passcode;
- Scroll down and determine what you want to “Allow Access When Locked”;

For me, as you can see in the screenshot above, I’ve decided that the only things I want to be able to do on the lock screen are to access Siri and reply with a message.
Everything else requires the phone to be unlocked.

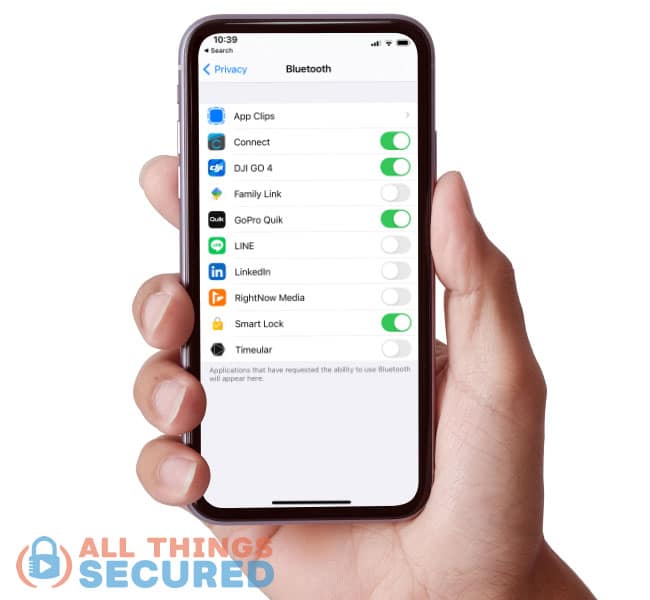
Manage Location & Bluetooth Permissions
Next, we’re looking at our location and Bluetooth permissions. I’ve been surprised by the number of apps that request permission to use these features for no apparent reason.
For example, when I checked my Bluetooth permissions, I saw that the LinkedIn app had somehow requested and been given permission to use my iPhone Bluetooth connection. Apparently, LinkedIn uses this for a “find other members nearby” feature, but that’s just ridiculous.
That what a quick and easy “opt out”.
How to Change Location & Bluetooth Permissions
Both location and Bluetooth settings can be found in your Settings app when you scroll down and click on Privacy.
Click on Bluetooth and audit the permissions. It’s a simple “on” or “off” for Bluetooth.
Going back into Privacy, you can find Location Services at the top. Here you’ll see that Apple gives you three options to choose from:
- Never
- Ask Next Time
- While Using the App
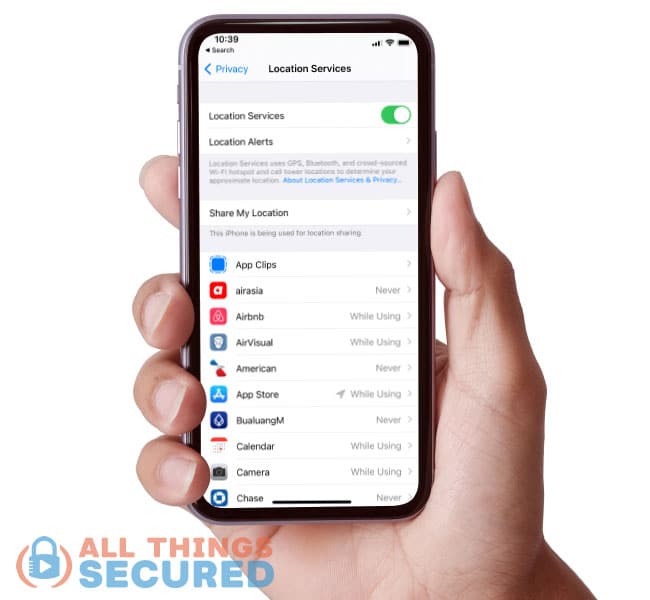
And you see that grey or purple icon next to some of the apps?
This shows you which apps have logged or used your GPS location in the past 24 hours.
Take a couple of minutes to look at these important iPhone security settings and decide which apps really need access to your Bluetooth and Location settings. There shouldn’t be that many.
And if you’re worried about somebody tracking you, you can always look at ways to fake the GPS data on your phone.
Start Using a Password Manager
The next part of your mobile security is something I preach for anybody using any device: a password manager. On average, each of us has more than 150 online accounts for which we have to keep a username and password.
Personally, I have more than 350.
The only way to manage that number of accounts is by reusing the same password in multiple places or by using a good password manager.
If you’re still using weak passwords in 2026, it’s high time you look into third party apps for generating robust passwords.
While it may seem risky for those who don’t know much about it, it’s actually a very secure way to create, store, and retrieve high-quality passwords. Whenever I log into any app or account on my iPhone, I click on the “Passwords” here and my username and unique password are filled in automatically after Face ID or Touch ID is confirmed.
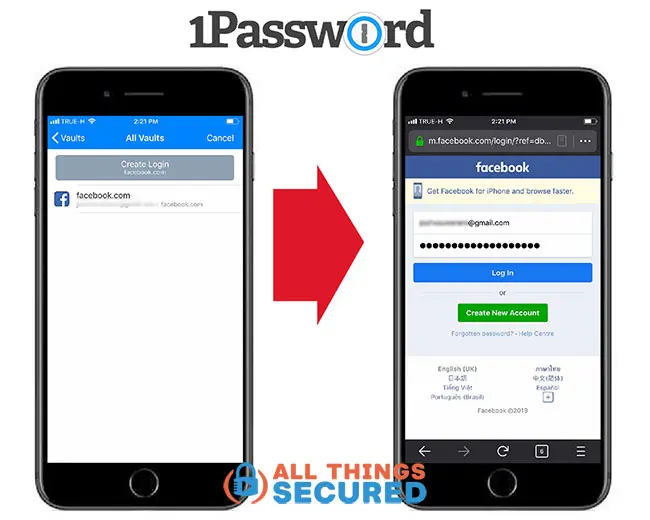
There are plenty of great password manager apps on the market, including the native Keychain that you can use on any Apple device.
Setting Up Your Password Manager
Once you’ve chosen the password manager you want to use, you’ll want to do the following:
- Open the Settings app;
- Find and click Passwords;
- Click on AutoFill Passwords;
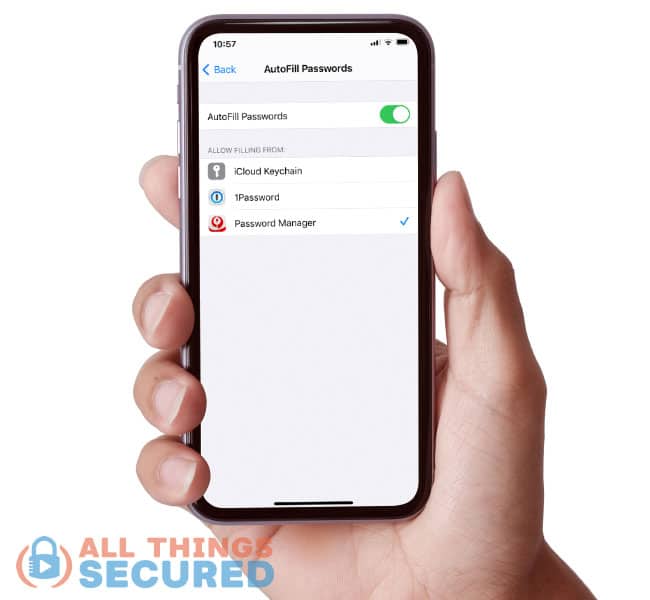
Choose the password manager that will autofill your logins for participating websites and apps (only password managers you’ve already downloaded will be available on this list).
Prevent Email Tracking With Mail Privacy Protection
Email tracking has become increasingly common, giving senders insights into when your message opens and even your location. Apple’s Mail Privacy Protection is a game-changing feature that blocks senders from tracking your mail activity.
Once activated, this feature ensures that all remote content is anonymously loaded by Apple servers, safeguarding your IP address and location from the sender.
How to Turn on Mail Privacy Protection on iPhone
Use these instructions to activate Mail Privacy Protection on your iPhone:
- Open the Settings app;
- Tap on Mail;
- Scroll down and select Privacy Protection;
- Toggle the “Protect Mail Activity” switch if it’s not already turned on.
Delete Facebook, LinkedIn, etc.
This next tip for securing your iPhone may seem weird, but hear me out.
Go to your home screen, find the Facebook app, and then tap and hold until you get a menu option to pop-up. Click “Remove App” and then “Delete App”.
I’m kinda joking here, but also kinda not.
There are some apps like Instagram or various messaging apps that are difficult to use without your phone. Others like Facebook, LinkedIn, and Twitter, however, can honestly be accessed just as easily on your internet browser.

And the Facebook app is notorious for attempting to track everything you do. Now newer versions of the iOS operating system are taking a very proactive step against apps that track your data and are forcing them to request to do so, but there’s a lot we don’t even realize that we give over sometimes.
No matter whether you use the app or your browser to access these social media sites, doing a separate audit of your privacy settings is important.
I’ve already created a Facebook security feature tutorial, but this requires you to get your hands dirty and dive into your privacy and security settings on Facebook.
Enable 2-Factor Authentication
If you’ve never heard of 2-factor authentication, it’s a second way beyond just your password to verify that you are who you say you are. In the case of your iPhone’s iCloud account, this is a way to secure anything that you store in the iCloud including photos, contacts, and messages.
Two-factor authentication is recommended for any app that allows it, but for your iPhone, I’m looking specifically at your iCloud account. We have an entire tutorial on how to add a 2FA key to your iCloud account, or you can get a brief overview here.
How to Add 2-Factor Authentication to iCloud
There’s no good reason not to turn 2-factor authentication and biometric authentication on for your iPhone, so check to see if it’s on for you:
- Open your Settings app;
- Click on your name at the very top.
- Here you’ll click on Password and Security;
- Find Two-Factor Authentication
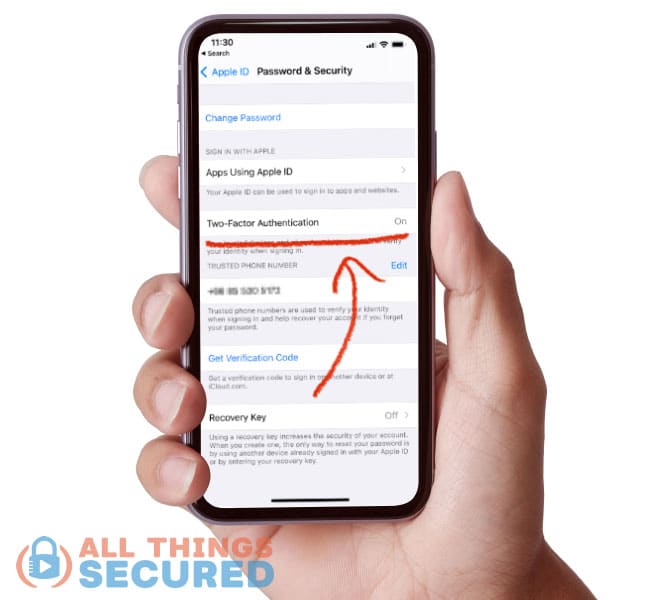
If it says “On”, like you see in the screenshot above, you’re golden. If it says off, you’ll want to go through the process of turning it on. If prompted, enter your apple ID password. What you’re seeing here is specifically for iCloud, but you can add 2FA to your Gmail account if you have that connected as well.
And a little side note: once 2-factor authentication is turned on for iCloud, it can never be turned off. Don’t worry – this is a good thing.
Limit Photo GPS Tagging
Did you know that when you share an image with somebody taken by your iPhone camera, it often comes with GPS coordinates of exactly where that photo was taken? As in, down to just a meter of accuracy.
Thankfully there are many places, such as Facebook, where this photo EXIF data is automatically removed, but in other cases, such as posting it on your own website, somebody could determine your exact location using this hidden data.
How to Limit Photo GPS on iPhone
There are two different directions you could go here with this setting.
For those who can see no good reason for having GPS data associated with your photos, you can turn it off completely.
- Open the iPhone setting app;
- Click on Privacy;
- Click on Location Services at the top;
- Scroll down to find the Camera app
If you set this to “Never”, the GPS data won’t be recorded. Or you could just turn off Precise Location so that it’s not exact coordinates.

For those of you who like location data for your photos, you can simply remove the data when you share the photo.
For example, when I click to share this photo, I can click Options at the top and then turn off the location data.
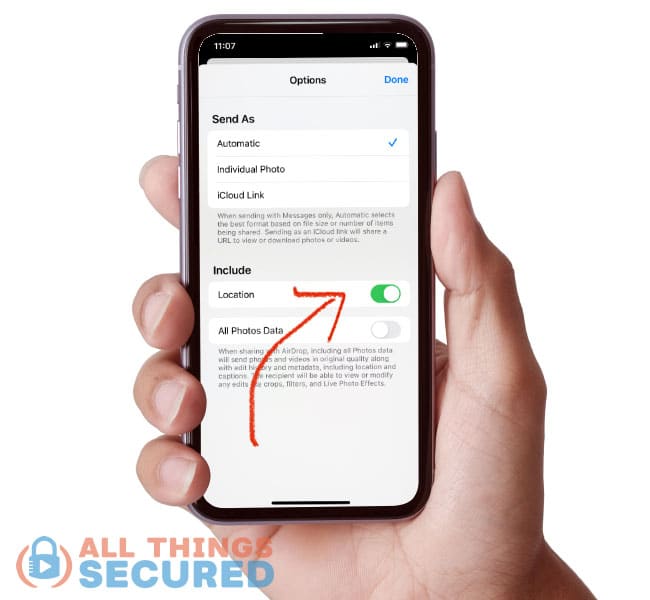
It will now share the photo without any of the GPS data on it.
BONUS: Use a Secure Mobile Provider
It’s scary to consider just how much data you send through your mobile phone provider, and how very little security they provide. Consider the fact that the data for more than 37 million T-Mobile was hacked in late 2022.
Thankfully, the iPhone is generally considered a very secure phone, but most people aren’t aware that there are options for secure mobile phone services that are available.
Services like Efani (read our full Efani review) run on the same network as many of the major providers but add significantly greater privacy and security to protect you from some of the most common attacks such as SIM swapping.
Monitor Your Kids’ iPhone Security Settings
Finally, while this may not apply to everybody and is worth its own tutorial, I’d like to touch on device security for our kids.
It’s important to go through your kids’ devices and make these kinds of changes for them since they won’t be doing it themselves. But it’s also worth securing the devices of younger children by controlling what they can or can’t see.
Some of this can be done via Apple Family, but there are also other apps that can help with this.
Final Thoughts | iPhone Security Settings
Don’t wait to make these kinds of changes to your iPhone security settings!
This is important even for those who don’t think they have anything valuable on their phone. You don’t realize just how valuable the information on your phone is.
Be sure to subscribe to the All Things Secured YouTube channel!